
Final Project Plan
I am leaning more now towards making the musical elements tie in with Ethiopian music. Artists like Hailu Mergia, Mulatu Astatke, and Emahoy Maryam Guebrou. I like the rolling trills of their musical modes, which I want to incorporate here and to learn and to educate. It would be cool to have a user roll through “The Homeless Wanderer” for instance at their own pace with the wand.
Wand Prototype
I was very excited to get this going! I had a number of errors regarding the code, resulting in an infinite loop that bricked three Arduinos, or so I thought. Thanks to Tom Igoe, I was able to reset them by pressing the reset button twice in quick succession. This will disable the code from running on the Arduino, but it will show up again in the IDE.

2” cut acrylic piece from Canal St. Plastics.
I worked with an Arduino MKRZERO to output MIDI to Ableton via the MIDIUSB library. The nice thing about the MKRZERO is that it will appear as a MIDI controller in Ableton. I began sorting the code from an example code from the MIDIUSB github for note on / note off. The MKRZERO was getting accelerometer data from an Adafruit BNO055 unit. I connected the two using 10-12 feet of wire wrap, which will not be my first choice in the future as it coils up on itself in a miserable way, thus the masking tape along the length of it as see in the video above.
The next trick was to map the data from the X plane of the accelerometer to output MIDI notes in segments as I waved it from left to right and back. With help from my professor Luisa Pereira, I was able to set up the code to only trigger notes when the wand data passed into each new segment of the X axis. Originally, the wand would trigger notes constantly when in each new zone, but with the help of a “switch” in the code, the wand could track whether it was moving into a “new” area. If it entered a new area, the wand would output a “noteOn” message, and as it left that area, it would send a “noteOff”.
p5 interface - click here to see the code.
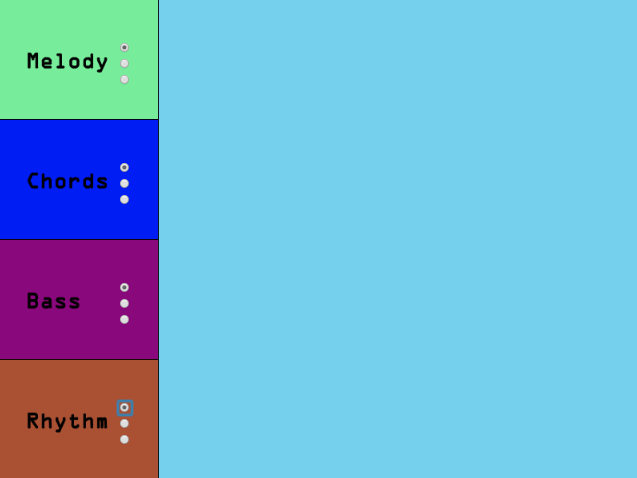
I would like to add a button for further functionality as I tie it in to the p5 interface which is linked here. The interface will allow the user to switch between different accompaniment styles. There are three Rhythm, Bass, and Chord choices as well as different scales on the Melody. The user will hover over one of the three buttons and select with the wand button by clicking. In the blank space, I am thinking of having some simple FFT visuals for now.
So I would like to explore using the mouse properties of the MKRZERO simultaneously with MIDIUSB. I could draw a cursor on the sketch and use the wand to control it by mapping the X and Z data of the accelerometer (not Y because that is rotation in this case). I would rather have access to the Mouse/Keyboard features of the MKRZERO to avoid this extra programming.
Future improvements include adding a battery and bluetooth compatibility so that the wand can be wireless.
Design Planning
Verplank’s IxD Framework
I got a lot out of reading Verplank’s IxD Framework. One great takeaway was to be mindful of the mapping time between the feel and know functions, as this has always been a criticism with many musical installations. There is often not a clear path between Do & Know, so that users are left puzzled, assuming they hear a difference, when in actuality, only the designer knows what is going on and the doesn’t know the user doesn’t. This is a process that I would want to avoid in my design. As such, I believe the Wand project will give users the ability to have direct mapping to the experiences they feel and will know quickly how to manipulate these environments. Here is my design as mapped out on Verplank’s Framework.
The Wand-ton?
One area I would like to feature is the Display area. This is inspired by the Yamaha Electone series of organs which are in the spinet lineage. My family had one in our home growing up that resembled the second photo below. Being an all-analog organ, it was a marvel of analog technology, built up over many decades of design expertise. While searching online, I must have found 10-15 similar models, none of which were exactly like the layout we had. Nonetheless, this organ had a number of useful features that I would like to incorporate into my design.
The Yamaha Electone E-70 - a bohemoth.
The Yamaha Electone B-45 - the home version.
The Electone that I grew up is pictured on the right which had a smaller feature set and allowed the user to control the following parameters:
Tempo - via a single knob
Rhythm - via buttons to pick pattern patterns
Bass - via buttons to choose pattern, based on the lower manual input
Accompaniment - chord inversions and pattern, overlaid on the lower manual input
Timbre - via buttons and sliders for the upper and lower manual

Not pictured: single button click on the wand.
In addition, there were footpedals, a built-in spring reverb, and tone controls over the rhythm elements! I still have this organ back in Nashville and have used it on my recordings over the years.
As you will see below, I have taken these elements and mapped them onto my display below with the additional parameter of Solo. Since there will be no keyboard manuals on my device, the user will use the wand to control an cursor on screen. By using the wand’s single button, they can hover and click to cycle through preset chord progressions, which the bass and accompaniment will follow, much in the same way the rhythm patterns are pre-set.
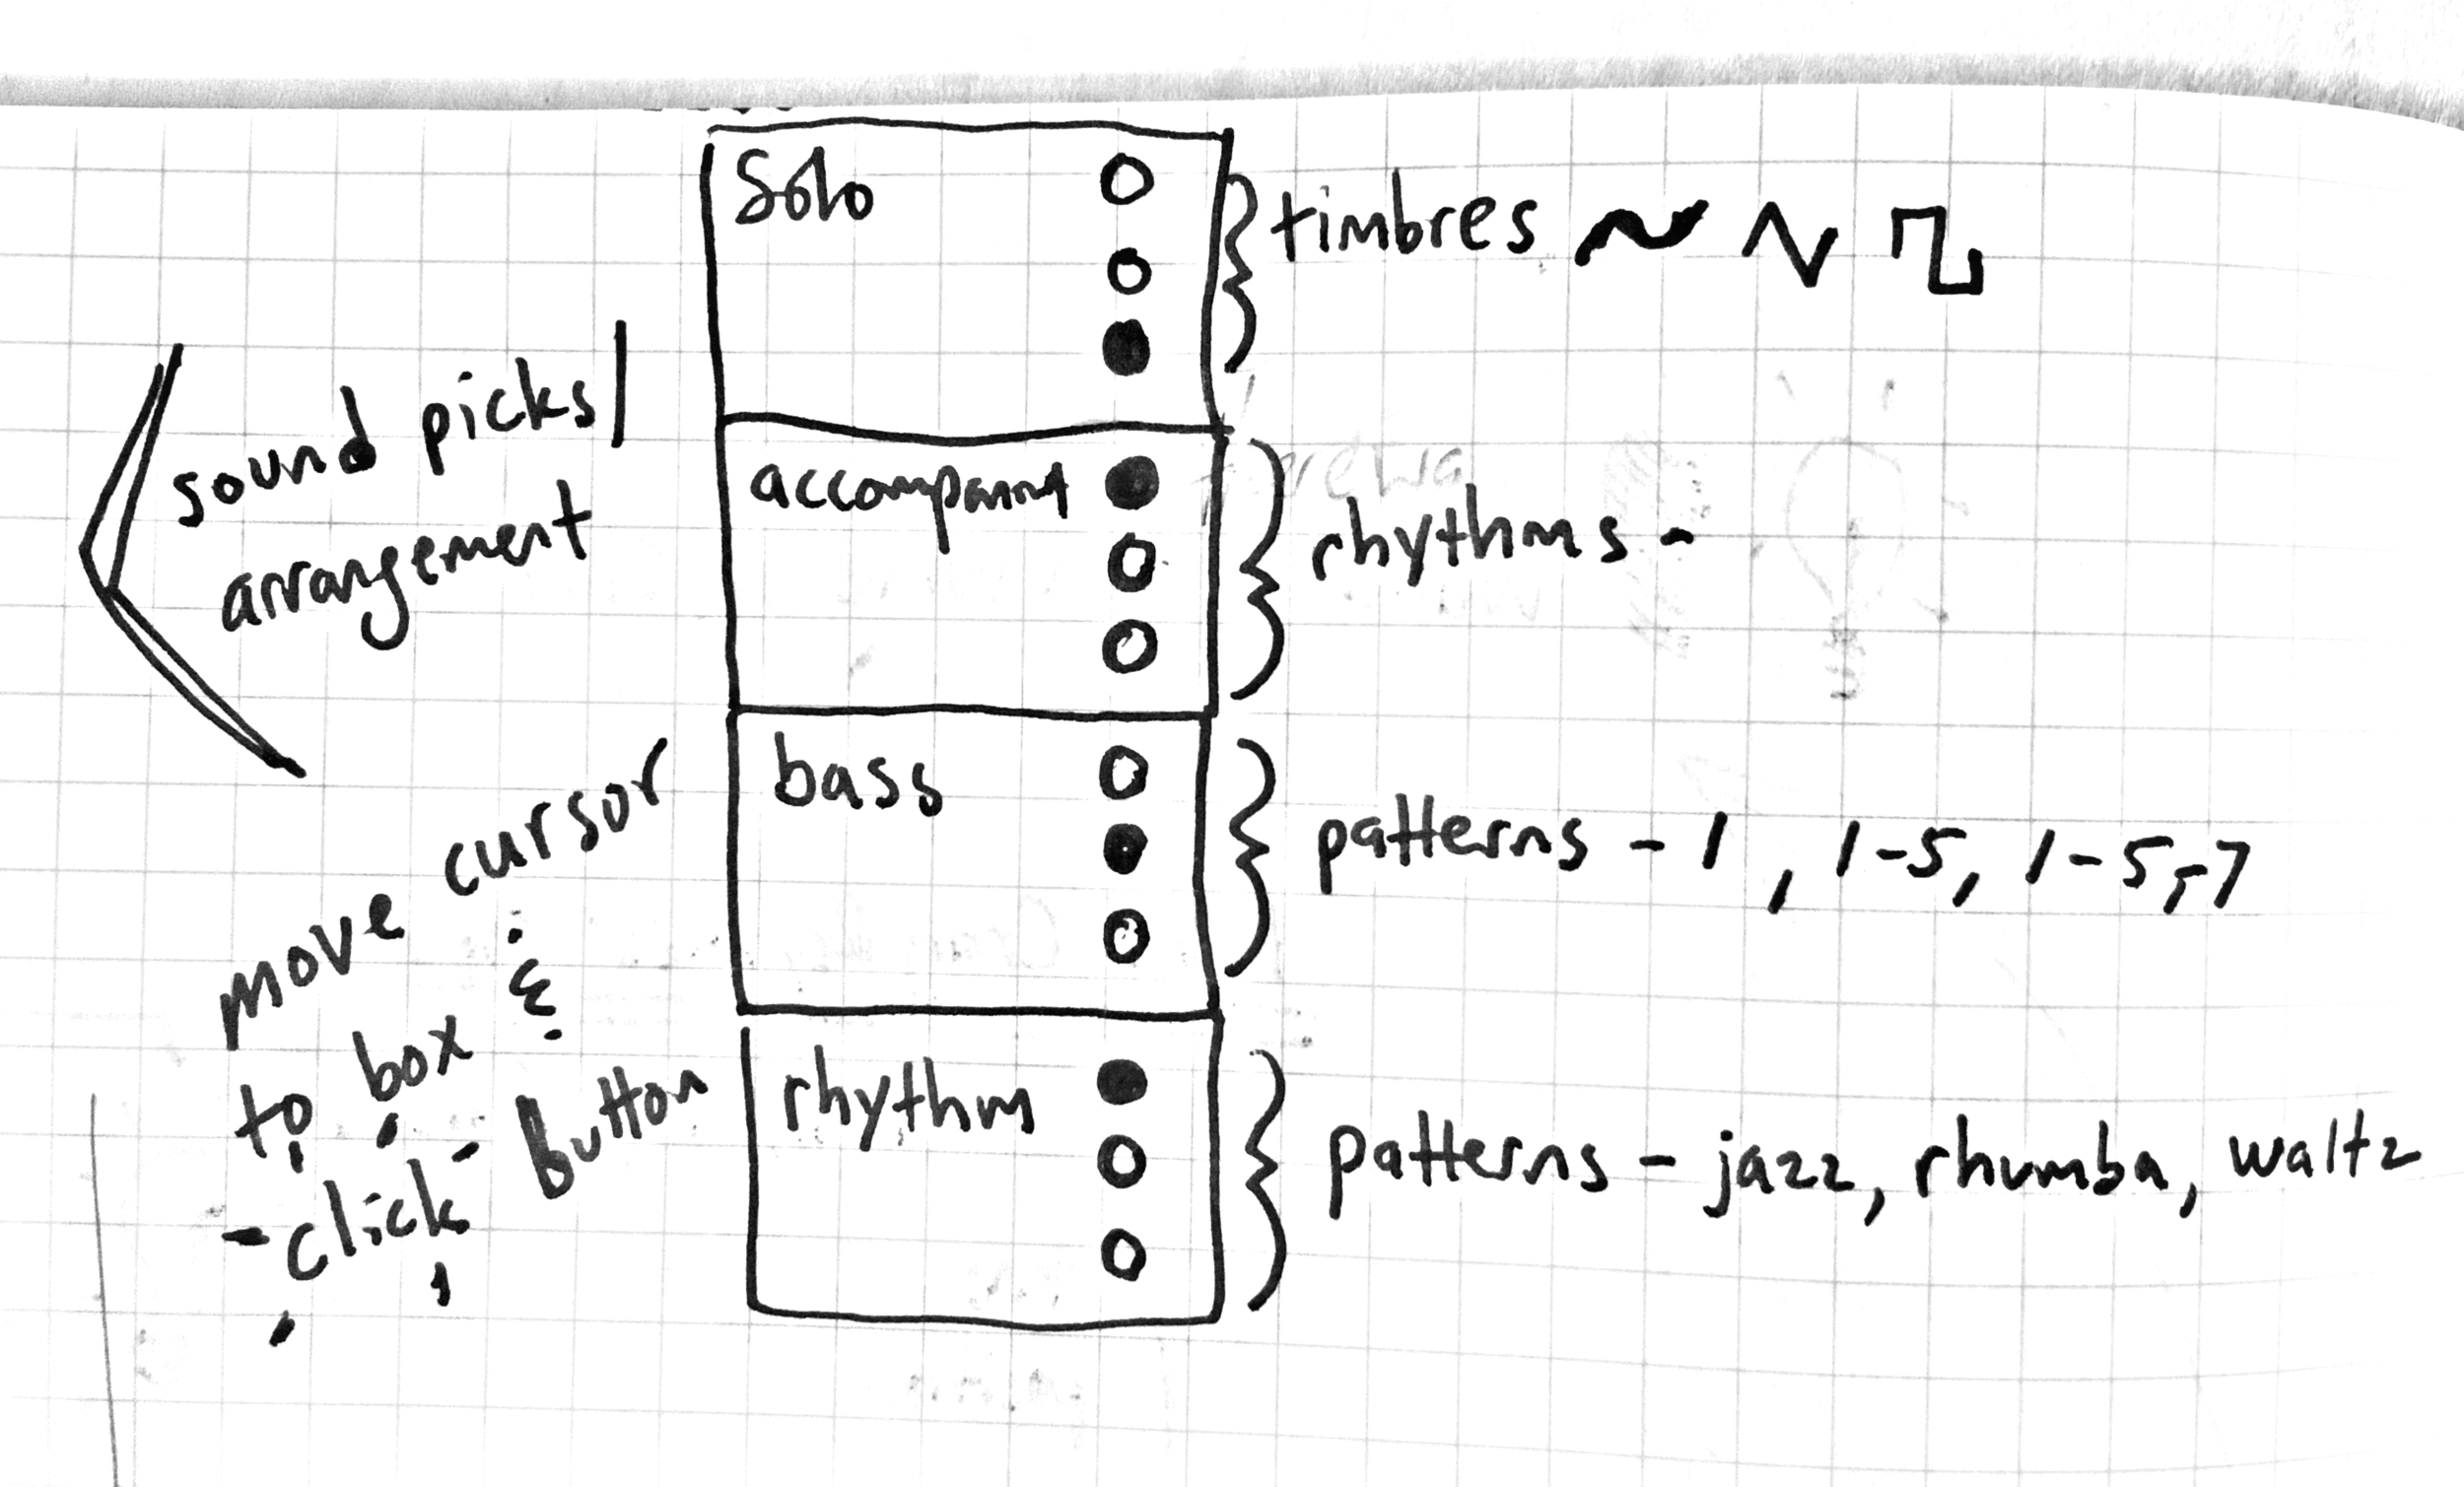
Finally, users will have the option to then choose a musical mode or scale to “Solo” with by waving the wand left and right on the x-axis to sweep up and down the note scale over a two octaves. The scales are taken from the Animoog App, as pictured below.

The Animoog - a synth app by Moog.
7-Axis Dimension Space Diagram
This was a helpful exercise in seeing where my project falls on a number of useful evaluation modes and also opens up the project to other possibilities, some of which I have added in red in the diagram. I could add a control box to give users more control, as well as adding sounds as the user “clicks” an item on the screen.
Do // Feel // Know ↵
Do: Pick up the wand
Feel: Hear a sound
Know: How you move the wand effects the sound ↵
Do: Move the wand side to side
Feel: Hear the pitch go up and down
Know: That the pitch is tied to the wand movement
Do: Pick up the wand
Feel: See the screen light up
Know: The wand is tied to the screen somehow ↵
Do: Move the wand
Feel: See the cursor on the screen move
Know: That the cursor is tied to the wand’s movement ↵
Do: Move the cursor to different places on the screen
Feel: See the screen change colors when the cursor hovers over each area
Know: That there are areas you could choose ↵
Do: Click the button on the wand
Feel: The button make an audible clicking sound
Know: That the button “chooses” items on the screen
I didn’t get the chance to prototype these behaviors. The next steps for me are to build the wand, which is just a recreation of a PCOMP mid-term project from last semester. And then I need to explore how to trigger sounds from p5 and compose them as loops in Ableton.
Ableton Composition
Here is my first composition in Ableton!
I’m so proud :) I have fought getting to learn this program for years, and I am happy to see what it can do. The process was clunky at first, but once I got the work flow from making the loops, to arranging them live, and then switching to arrangement view to do the finishing touches, it all made a lot more sense. I would still like to touch this song up for sure. The arrangement is a bit long.
As far as my project goes, I don’t know if lasers are still a part of the game.. As it stands now, the idea is for the user, who is let’s say at an interactive media show in a gallery of sorts, to use a wand to control an array of possible pitches via Midi. The song above would play and they would have control over the melody. There will be some visual elements as well to either guide them or simply entertain. I am also envisioning maybe two more songs that the user could “play” with different interactions on screen.
In a different song for example, the user would be using the wand to control a pin on the screen to pop balloons which would have note names on them. When they pop, they play a midi note. The final interaction would perhaps have a Guitar Hero aspect, less improve and more of a test of skill with the wand.I have some things to learn with MIDI and Arduino and p5 and Ableton!
Lasers, Mirrors, Wands, Visualizers, Projections, et al.
Prompt
My project is designed to be in an art space ideally in a 20 x 20 space. I would want it to be entertaining and accessible to users of all musical abilities. It would have an educational element to it. I am discussing working together with another student on this project. I would like to use a wand to control pitches and feed the sound of those pitches to a transducer attached to a mirror which will reflect a laser onto the wall. I’d like to experiment with array of laser/mirror/transducer combinations and play with scales, phase, multiple transducers on one mirror and perhaps mixing in projection elements for a backing track to the experience.
Here is an example of what I would like to build off of.
User Path
I love cascading, layering, fluttering sounds, each part revealing themselves in harmony, both in pitch and timing. I would like for people to see music like I see it - from a production standpoint, keying in on individual elements and their role in painting the whole picture. The user would act almost as orchestrator and soloist. They would have control over the elements of the music, and see visual feedback as each element is layered in or out. And they could “solo” over it with the wand, either refined to scales.
Listen to this Hailu Mergia song and imagine controlling the layers and the wand being the lead organ.
Song Example
Ix Music Concept
Inspiration for our concept came from on the song “Before I Let Go” by Frankie Beverly & Maze which is evocative of a typical African American barbecue in, say, Prospect Park. The piece would be on location, set up around the public barbecue pits and picnic tables in Prospect Park on a warm, sunny Sunday afternoon in late Spring. As observers approach, they hear the song wafting and mixing with the odors of sizzling meats and skewered vegetables. Lurking is a large bottle of barbecue sauce (or 5). The closer that the observers get the more they can make out the individual elements of the song, and as they enter the scene, they begin to notice that each element of the song is mapped to a specific area or feature of the barbecue. In this R&B pop song, the vocals are central much like the fact that the whole barbecue scene centers around the barbecue itself.
From here, we mapped the musical attributes of the song in emotional or sonic characteristics to specific features of the barbecue, where a loudspeaker playing each musical element would be placed next to each element of the barbecue.
Our Oblique Strategy was “Cluster Analysis” which got us thinking of song elements in groups of rhythm, chordal, and melodic.
Here are some of the groupings we brainstormed:
the barbecue - vocals are most important
neighbor’s sprinkler - high hats
old men playing cards - bass
trees, grass - rhythm guitar
red cups - hand claps
tupperware - bongos
dog sounds - background vocals?
utensils, plate crashing - cymbals
birds sounds - shaker
kids playing - ??
picnic table - ??